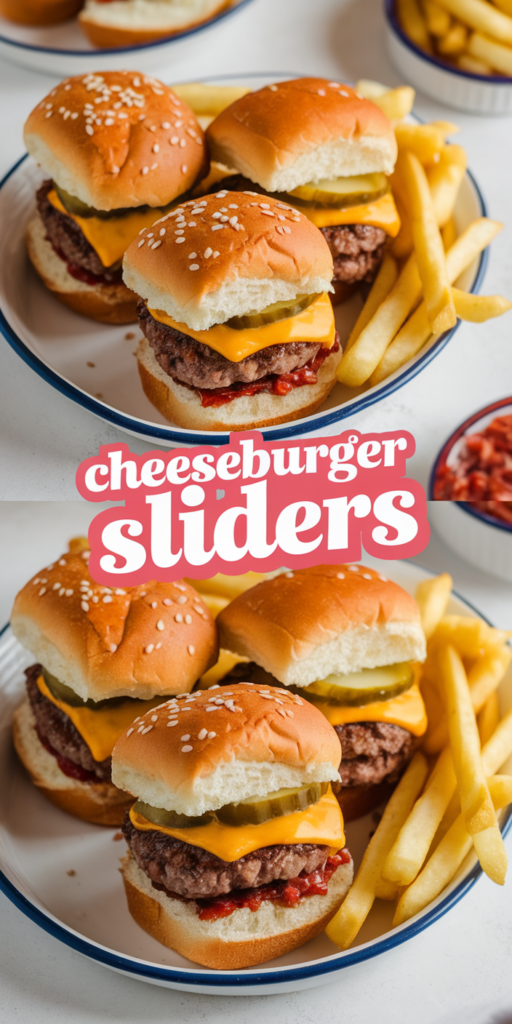
The smell of cheeseburger sliders cooking is amazing. It was my first time making them for my friends. We had only 30 minutes, but I wanted to impress them.
I found an easy recipe for cheeseburger sliders. It made everyone happy and let us spend more time together. We made 24 sliders, perfect for sharing or eating all by myself!
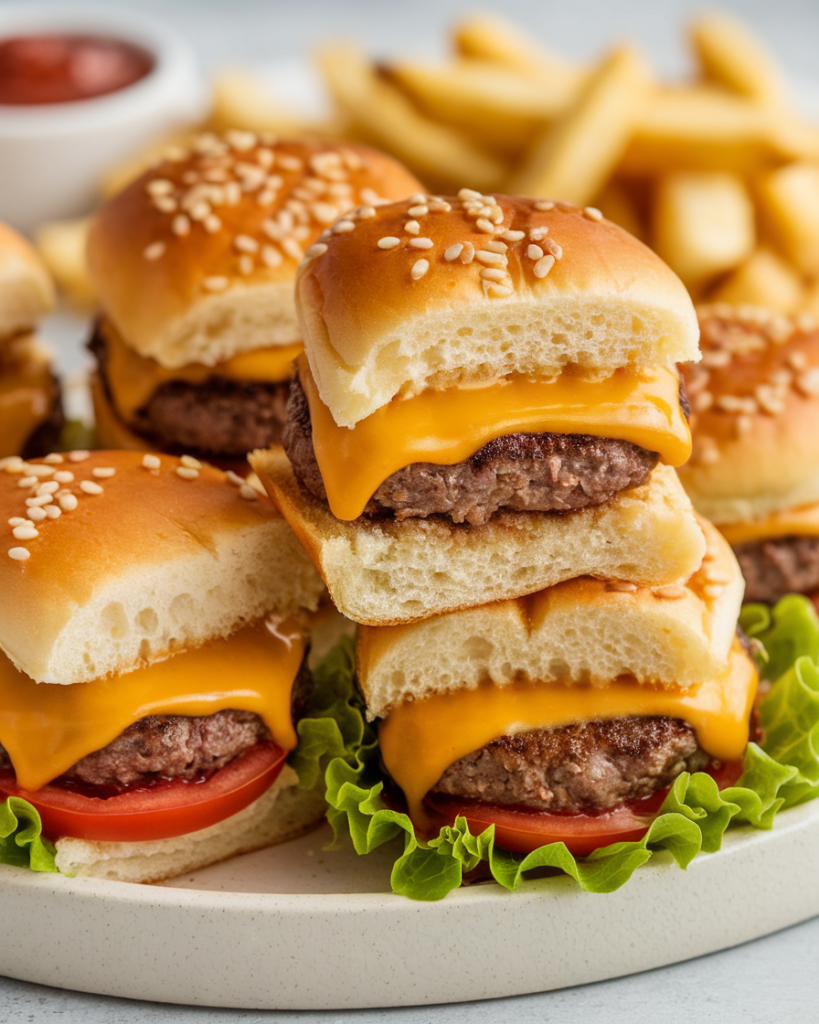
In less than 30 minutes, I made a platter of golden sliders. They were a huge hit. Using lean ground beef made them juicy and tasty. Adding the right toppings was key.
This simple recipe became my favorite for gatherings. Now, let’s talk about why you’ll love making these sliders too.

Introduction to Cheeseburger Sliders
Cheeseburger sliders are loved by many. They have all the flavors of big burgers but are smaller. They’re great for parties because they’re easy to eat.
At a family party, everyone loved the sliders. They’re easy to make in big batches. This makes them perfect for feeding lots of people.
Making cheeseburger sliders takes only 30 minutes. They’re perfect for any party. Kids and adults both love them.
The mix of juicy beef, cheese, and soft rolls is amazing. You can add different toppings and sauces. This makes them a favorite at any party.
Why You’ll Love This Easy Cheeseburger Sliders Recipe
Making easy cheeseburger sliders is fun and quick. They can be ready in 30 minutes or less. These sliders are juicy, cheesy, and buttery, making them irresistible.
These sliders are great for many occasions. They’re perfect for birthdays, game days, or family dinners. You can make up to 24 sliders at once, so everyone gets some.
Each batch makes about 12 sliders. You can easily make more by doubling or tripling the ingredients. King’s Hawaiian Sweet Rolls add a delicious flavor to the sliders.
The recipe is easy to follow. You just need fresh ground beef and the right cheese. You can also add bacon, onions, and condiments for extra flavor.
After baking for 15-20 minutes, your kitchen will smell amazing. People love these sliders, and you can store leftovers for 3-4 days. Reheat them in the oven, microwave, air fryer, or toaster oven.
Cheeseburger Sliders (Easy, 30-min Recipe)
Making 30-min cheeseburger sliders is fun and rewarding. You can make these easy sliders in 40 minutes. They’re great for parties or a quick dinner.
Each serving has about six mini cheeseburgers. This means everyone gets a few. The sliders taste great with lean ground beef and tasty toppings. Sweet Hawaiian rolls add a nice touch.
Overview of the Recipe
This recipe is quick and easy. It takes only 10 minutes to prepare and 30 minutes to cook. You’ll need two pounds of ground beef, half a diced onion, and a few other ingredients.
The result is delicious sliders for everyone to enjoy.
Key Features of the Sliders
- Quick cooking time of only 30 minutes
- Highly customizable with toppings like lettuce, tomatoes, and pickles
- Simple preparation means you can enjoy cooking without stress
- Perfectly sized mini cheeseburgers for easy handling at parties
- Pairs well with various sauces such as ketchup and mustard
| Ingredient | Amount |
|---|---|
| Ground Beef | 2 pounds |
| Onion | ½ onion, diced |
| Barbecue Sauce | ½ cup |
| Breadcrumbs | ¼ cup |
| Cheddar Cheese Slices | 6 slices |
| Hawaiian Rolls | 12 rolls |
| Optional Toppings | Dill pickles, ketchup, mustard, lettuce, tomatoes |
Essential Ingredients for Your Sliders
Creating irresistible homemade sliders needs the right ingredients. Knowing these parts can make your sliders better. Let’s look at the key elements.
Ground Beef Selection
For the best sliders, use lean ground beef. Look for a 90/10 or 93/7 fat ratio. This keeps your sliders juicy and prevents them from shrinking too much.
If you like thicker burgers, use 2 pounds of ground beef. This recipe makes 12 sliders from just 1 pound. It’s great for family gatherings.
Best Rolls for Sliders
King’s Hawaiian Sweet Rolls are the best for sliders. They have a sweet flavor and soft texture. This pairs well with the savory beef.
Each package has 12 rolls. They are about 2 inches in diameter. This size is perfect for holding your sliders.

Cheese Suggestions
Cheese is key for a gooey, melty effect. Use 6 slices of cheese, like American, Swiss, or pepper jack. Sharp cheddar is my favorite for its rich flavor.
The cheese makes the sliders taste even better. It combines well with the ground beef.
Step-by-Step Cooking Instructions
Making homemade cheeseburger sliders is fun. I’ll show you how to make them delicious and quick. You can make 12 sliders in about 30 minutes. Let’s start!
Prepping Your Ingredients
First, get all your ingredients ready. For my sliders, I use:
- 1 lb. of ground beef
- 1 pack of 12 dinner rolls
- 16 slices of American cheese
- Seasonings: garlic powder, onion powder, paprika, and kosher salt
- 3 tablespoons of minced dried onions
- Ingredients for burger sauce: mayonnaise, ketchup, sweet pickle relish, sugar, vinegar, salt, and pepper
Having everything ready makes cooking easier and more fun.
Cooking the Beef and Onion Mixture
Heat a big skillet over medium heat. Add the ground beef and onions, cooking for 6-7 minutes. Add 1 teaspoon each of garlic powder, onion powder, and paprika, and 1 teaspoon of kosher salt. Stir often until the beef is done and onions are soft. This mix makes my sliders taste great.
Assembling the Sliders
Preheat the oven to 375°F. Cut the dinner rolls in half but keep them together. Place the bottoms in a baking dish. Spread the beef and onion mix on the rolls. Put a cheese slice on each, using all 16 slices. Put the tops on and cover with foil. Bake for 10 minutes, then remove the foil and bake for 5 more minutes. Now, my sliders are ready to eat!
Top Tips for Perfect Cheeseburger Sliders
Making perfect cheeseburger sliders is more than just a recipe. I found some top tips for sliders. These tips will help your sliders be a hit, whether for a family dinner or a party. By following these tips, you’ll make delicious sliders that everyone will enjoy.
Keeping Buns from Getting Soggy
Soggy buns are a common problem with sliders. To avoid this, spoon out extra fat from the beef before adding the buns. You can also bake the sliders without a cover at 350 degrees Fahrenheit. This lets moisture out, keeping the buns firm and tasty.
Putting cheese on top of the beef and baking until it melts helps too. This cheese layer keeps the slider’s shape.
Make-Ahead Options
Make-ahead cheeseburger sliders are perfect for busy days or events. You can make them a day early. Just put them together with your favorite toppings and sauce, cover them, and refrigerate.
When it’s time to serve, bake them at 350 degrees Fahrenheit for 15 to 20 minutes. The cheese will melt, and the tops will get golden. This way, your sliders stay fresh and serving is easy, letting you enjoy the event too.
| Tip | Description |
|---|---|
| Spoon out excess fat | Reduce moisture buildup which makes buns soggy. |
| Bake uncovered | Helps moisture escape to keep buns crispy. |
| Use cheese layer | Add cheese on top of beef to create a protective barrier. |
| Refrigerate assembled sliders | Prepare sliders ahead of time for convenience. |
| Reheat in oven | Bake at 350°F for 15-20 minutes for the best flavor. |
Serving Suggestions for Cheeseburger Sliders
When serving cheeseburger sliders, think about making it fun. These sliders are great for parties. Try adding crunchy dill pickles for a nice contrast.
Baked potato wedges make a tasty side dish. They add crunch to your meal. Don’t forget to drizzle house sauce for extra flavor. Ketchup and yellow mustard are always a hit too.
Set up a buffet to let everyone make their own sliders. It’s a fun way to enjoy the meal together. It also shows off the sliders in a great way.
Pairing Options for Your Sliders
Enjoying tasty cheeseburger sliders is better with the right pairings. Choose sides that match well and make the sliders taste even better. Here are some great choices for a full meal.
Best Dipping Sauces
Here are some dipping sauces for your sliders:
- Homemade burger sauce made with mayonnaise, ketchup, pickles, Dijon mustard, and a touch of lemon juice
- Classic tomato ketchup with a hint of Sriracha for a spicy twist
- Garlic aioli for a rich, creamy option
- Honey mustard sauce to add sweetness
Side Dishes to Complement Your Sliders
It’s important to pick the right sides for sliders. Here are some favorites:
- Fresh garden salad with a tangy vinaigrette
- Classic French fries, crispy and golden
- Coleslaw for a crunchy contrast
- Loaded guacamole, bringing a fun twist
- Potato salad, perfect for gatherings
- Veggie tray with assorted dips for a healthier option
Making the Most of Leftovers
Leftover sliders can be just as tasty as new ones. When I make easy cheeseburger sliders, I often have extra. To keep them fresh, I store them in an airtight container. This keeps them good for up to three days.
I put parchment paper between the sliders to stop them from sticking. This helps a lot.
Reheating meal prep sliders is key. I like using the oven or air fryer. If I use the oven, I set it to 375°F and wrap the sliders in foil.
This keeps them moist. I let them warm up for 10-15 minutes. The air fryer is also great, taking 5-10 minutes at the same temperature. It makes them crispy again.
If I have too many sliders, freezing is a good idea. Wrapped right, they can stay good for three months. When I want to eat them again, reheating at 375°F makes them taste like new.
Fun Variations on the Classic Slider
Exploring fun slider variations opens a world of delightful possibilities. I love adding crispy bacon for a savory twist. The smoky flavor pairs perfectly with the juicy cheeseburger, making it an instant crowd-pleaser.
Sautéed mushrooms can transform the sliders into a gourmet treat. These earthy additions elevate the taste profile and deliver a satisfying texture. For a burst of freshness, consider topping the sliders with pickle slices and tomato, adding brightness to every bite.
If you’re feeling adventurous, why not try a tropical flair? A slice of grilled pineapple provides sweetness that contrasts beautifully with savory elements. Experimenting with unique cheeseburger sliders, like adjusting your cheese selection to include Swiss or American, can personalize these mini delights.
My creative slider recipes encourage customization. Based on your preference, the base sliders can be dressed with different sauces and toppings. I find that combinations of BBQ sauce and mustard create a rich, tangy flavor I can’t resist.
Whether you prefer classic versions or inventive versions, there’s no wrong way to assemble your sliders. Embrace creativity and have fun experimenting with flavors and textures. Make each unique cheeseburger slider a memorable treat for your family and friends.
Why These Sliders Are Ideal for Parties
Cheeseburger sliders are perfect for parties. They are small and easy to eat. This makes everyone happy and helps people talk more.
Making a lot of sliders is easy. You need just one pound of ground beef for ten sliders. Hawaiian rolls come in packs of twelve, so there’s extra for everyone.
Setting up the table is quick. It takes about 15 minutes to get ready. Sliders cook in 15-20 minutes at 350°F. This lets you enjoy the party while the food cooks.
Sliders are good for you too. They have 16-24 grams of protein. They taste great and aren’t too heavy. Serving them with homemade fries or pasta salad makes the party even better.
| Feature | Details |
|---|---|
| Servings | Yields 4 servings |
| Ground Beef Used | 900 g |
| Rolls Needed | 1 pack of Hawaiian buns (12 pieces) |
| Baking Temperature | 350°F |
| Total Cooking Time | About 30 minutes |
| Calories per Slider | Approximately 369 kcal |
| Protein Content per Slider | 15 g |
| Fat Content per Slider | 24 g |
| Recommended Storage | Up to 4 days airtight in the refrigerator |
Reader Feedback and Community Sharing
I’m excited to hear from all of you about your cheeseburger slider recipe experiences! Your feedback is very important. It helps not just me, but our whole food-loving community too.
Sharing your favorite changes or twists makes cooking these sliders more fun. Have you tried different cheeses or unique toppings? Maybe you’ve changed up the sauce? I’d love to hear about it!
Getting involved with community recipes is a great way to find new ideas. I encourage you to share your slider experience on social media or in the comments below. Let’s start a lively conversation where we all can share and inspire each other!
Every slider you make could be the start of a great story. So, please join in the conversation. Your ideas help me make my recipes better and make our community stronger. Together, we can make every occasion deliciously special.